


Chatbots have been a part of the digital world for quite some time now, but with advanced technologies like artificial intelligence (AI), they have also evolved and reached the next level. And that's amazing!

ChatGPT, also known as Generative Pretrained Transformer 3 (GPT-3), is today one of the most advanced chatbots on the market. GPT-3 was launched in 2020 by OpenAI, and although only a few years have passed, the tool has already made a big impression on the world.
Some are scared of the virtual intelligence we now experience as part of everyday life, while others are fascinated and manage to make full use of it - for example, with an integration to HubSpot.
Note that HubSpot has recently announced the 'AI Content Assistant' update, which is powered by ChatGPT (OpenAI's GPT-3 model). Read more about it here.
What exactly is ChatGPT?
ChatGPT is a modern chatbot based on AI. It is trained on a big amount of textual data, allowing it to generate answers to questions, write comprehensive texts, and participate in conversations with humans - real humans.
It's true!
GPT-3 is based on deep learning technology. With more than 175 billion parameters (a number that is still increasing), ChatGPT has the capacity to handle natural language tasks and queries of any chatbot on the market. This means that it can understand natural language in almost any context. Therefore, it is capable of having fluent and authentic conversations with users.
ChatGPT has already been trained on a vast amount of data, and each time it is used, it is further trained. With every passing minute, the technology becomes smarter. Today, it has a deep understanding of language and human behavior - but tomorrow it will know even more.
And some find that scary.
With its advanced technology and large amounts of data, ChatGPT can also handle and even perform a wide range of tasks. It can answer very simple questions. For example, it can provide a good recipe for dinner, but it can also contribute in more complex situations as a problem solver. Therefore, in the right contexts, it can be a tool that ensures increased efficiency in your business.
Did you know that ChatGPT can predict and generate text that is so authentic, it can fool people into thinking it's someone else?
This was demonstrated in a series of experiments conducted by OpenAI, where ChatGPT was asked to generate text that should be attributed to a specific person, and in some cases, the results were so authentic that they were difficult to distinguish from what an actual person would have written.
This demonstrates the high level of precision and authenticity that ChatGPT is capable of achieving.
With ChatGPT's ability to both understand and generate natural language in text format, you can advantageously integrate it with a wide range of systems and software, including CRM platforms like HubSpot and Salesforce.
By integrating ChatGPT with, for example, HubSpot, you will experience an ability to offer a more personalized customer experience. When you allow ChatGPT to use data from your CRM system, HubSpot chat can tailor any conversation with your customers and potential customers based on the information the system already contains, thus enabling you to deliver more relevant and engaging messages.
You can use the integration to automate parts of your customer service. If HubSpot's internal chatbot cannot find answers in your Knowledge base to what is being asked in your chat, ChatGPT can contribute with more than 175 billion parameters, which can be delivered directly in the same chat window.
How the integration between ChatGPT and HubSpot can transform your business
ChatGPT can be a great asset - and a strategic addition when using the internal chatbot in HubSpot. Therefore, it is a tool that can strengthen your presence and engagement with your customers and potential customers without you having to put in more work.
Below, you will be taken through the steps that ensure you can integrate your company's HubSpot with ChatGPT so that you can take advantage of the benefits. It is a simple guide where the basic steps are outlined, so why not give it a try?
You will also get some practical tips along the way, so you not only integrate the two systems but also optimize your integration. It is worth discussing the various options for using ChatGPT and HubSpot integration, including automating your customer service, increasing customer engagement, and improving lead generation.
Whether your company already uses HubSpot, ChatGPT, or both, we think that the following overview and simple guide can be helpful. It ensures that you get the most out of your integration, so you can increase your company's efficiency and productivity.
Get control of your ChatGPT token - 7 simple steps
- If you already have a ChatGPT account, you can skip this step. Otherwise, you need to create an account. You can do so here. Please note that OpenAI automatically gives you $18 in credit, which you can use, but this credit is only active for 3 months.
- Log in to your account and go to your OpenAI Dashboard. Here, in the menu on the left side of the screen, click on the 'API Keys' tab.
- Click on 'Create New API Key' to create a new API key.
- Choose an appropriate access level for your API key. You can choose from the following access levels: Developer, Standard, Plus, and Pro. Each level offers different features, but also limitations, so be sure to choose the level that best suits your needs.
- Once you have chosen an appropriate access level, you need to provide a description of the API key you have just generated. This step is intended to help you remember what the key is for and how to use it.
- Click on 'Create API Key' to create your new key.
- Copy your new API key and save it in a secure place. It may also be a good idea to create a variable in your program or code so that you can easily access the key.
Get control of your HubSpot token - 5 simple steps
- Please log in to your HubSpot account, go to 'Settings' and click on the 'Integrations' tab, which you can find in the left-hand menu of the screen.
- Then click on 'Private App' and on 'Create a Private app'.
- Choose an appropriate scope (access level) for your API key. You can choose from all the different elements in HubSpot, but for this guide, we recommend using 'conversations.read' and 'conversations.write'.
- Give your newly created Private App an appropriate name and a good description so that you can remember what it is used for in the future.
- Activate, and you are now ready to build.
Build your HubSpot Chatbot with ChatGPT - 11 simple steps
1. Create a Property
Before you start creating your chatbot, you need a place to store the input / data that a user enters in your chat. You create this by creating a new Contact Property. To do this, go to 'Settings', select 'Properties' from the menu on the left-hand side of the screen, and 'Create Property'. Then follow these steps:
- Under 'Group', choose an appropriate group (in this guide, we have chosen 'Contact Information')
- Give it a descriptive name (in this guide, we have chosen 'ChatGPT')
- Write a good 'Description' for your new property
- Click 'Next'
- Select 'Multi-line Text' as the 'Field Type'
- Under 'Property Visibility', enable 'Show in forms, pop-up forms, and bots'
- Click 'Create'
2. Find Chatflows
Once you have created a new property, select the 'Conversations' tab in the top menu, and then click on 'Chatflows'.
3. Create a new chatflow
Click on 'Create chatflow' and select 'Start from scratch'.
4. Make it possible to save answers
Now select an appropriate welcome message and add a new 'building block'. For this block, choose 'Ask a question' and then 'Custom question'. This way, you will have the opportunity to save the answers that a user enters in the property that you created in step 1
5. The technical part
Now we're getting to the more technical part, as we're going to work with the code itself.
You need to start by 'calling' ChatGPT via the response you received from the user with the token (access code) you found through the section 'Get control of your ChatGPT token - 7 simple steps'.
Add a block under your question and select 'Run a code snippet' under the 'Automation' tab. When you do this, the block will open up and you'll have the opportunity to write Node.js code directly in the HubSpot platform.
Make sure to give this action an 'Action Name'. It's only used internally and to give you a good overview in the overall flow. After that, create a 'Description' and click 'Save'.
6. Open in full page editor
Then click on the small blue button 'Open in full page editor'.
With this action, you enable the options to test, add your ChatGPT token and, most importantly, find out if something goes wrong.
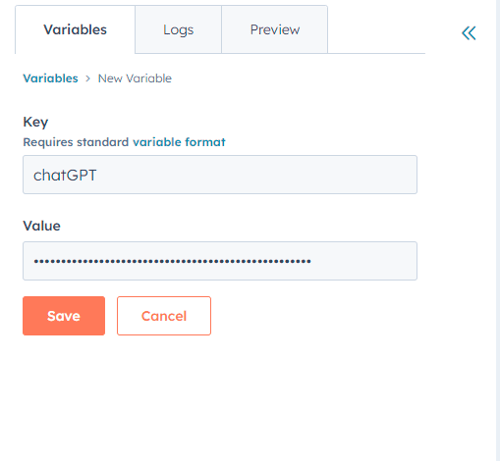
7. Insert token
In the full page editor, in the tab at the top left, click on 'Variables'. It's important that you name it under 'Key'. Then, insert your token from OpenAI in 'Value' and click 'Save'.
8. Replace demo code
You must now replace all the demo code that already exists with the code below:
const request = require('request');
const hapikey = process.env.chatGPT // Change "ChatGPT" if your KEY is different from step 1

exports.main = (event, callback) => {
  const { userMessage } = event;

  // Get the user's message
  const message = userMessage.message;

  const options = {
    method: 'POST',
    url: 'https://api.openai.com/v1/completions',
    headers: {
      'Content-Type': 'application/json',
      'Authorization': 'Bearer '+hapikey
    },
    body: JSON.stringify({
      "model": "text-davinci-003",
      "prompt": message,
      "temperature": 0.7,
      "max_tokens": 200,
      "top_p": 1,
      "frequency_penalty": 0,
      "presence_penalty": 0
    })
  };

  // Promise that makes the request
  const makeRequest = () => {
    return new Promise((resolve, reject) => {
      request(options, (error, response, body) => {
        if (error) {
          reject(new Error(error));
        } else {
          const result = JSON.parse(body);
          const chatgptResponse = result.choices[0].text;
          const responseJson = {
            botMessage: chatgptResponse,
            responseExpected: true
          };
          resolve(responseJson);
        }
      });
    });
  };

  // Call the Promise and handle the response or error
  makeRequest()
    .then((responseJson) => {
      callback(responseJson);
    })
    .catch((error) => {
      callback(error);
    });
};

// Created by Martin Mensbo Christiansen @ MCB.dk
// Created 2/23/2023 @ 12:30
// Questions? - Reach out directly at mac@mcb.dk
9. Test your code
Once the code has been inserted, click 'Save' and you are ready to test your code with ChatGPT.
10. You're almost there
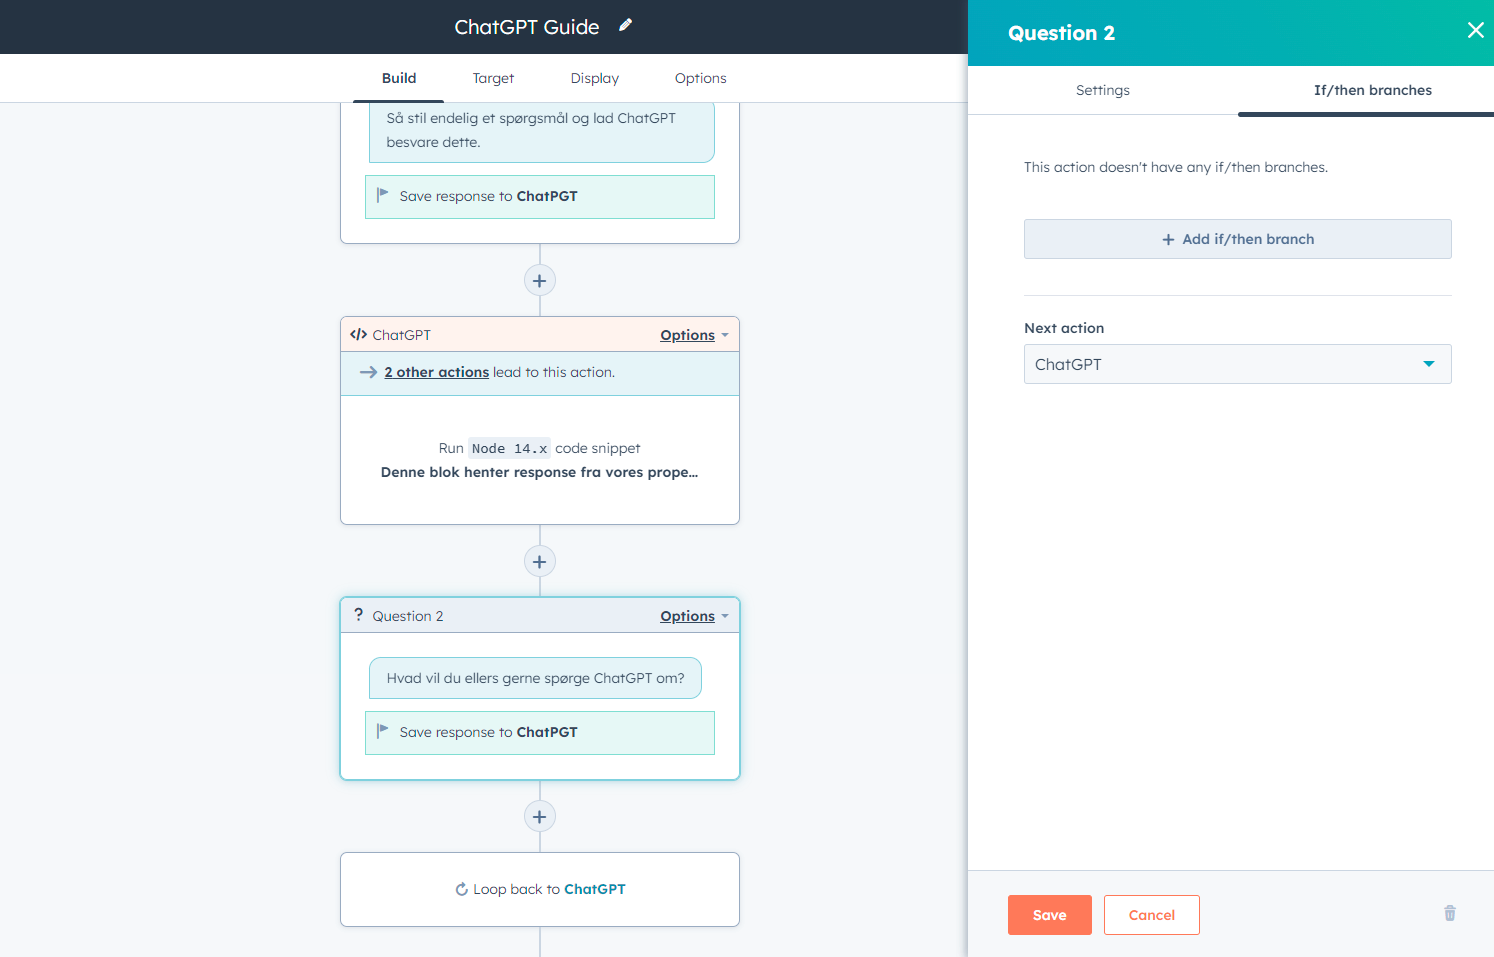
Add another block with a question that saves the response to the property you previously created.
11. Add an 'If / then' branch
Add an 'If / then' branch to ensure that the chat doesn't end while a conversation is in progress. It ensures that the user only needs to ask another question, and the chat continues.
You have now integrated ChatGPT with HubSpot. Wasn't that easy?
If you have any questions about the entire flow or if there is anything that is not working on your platform, please feel free to reach out with your questions. We are always ready to help you find the solution that is most optimal for your business.

Maybe this is something for you as well?